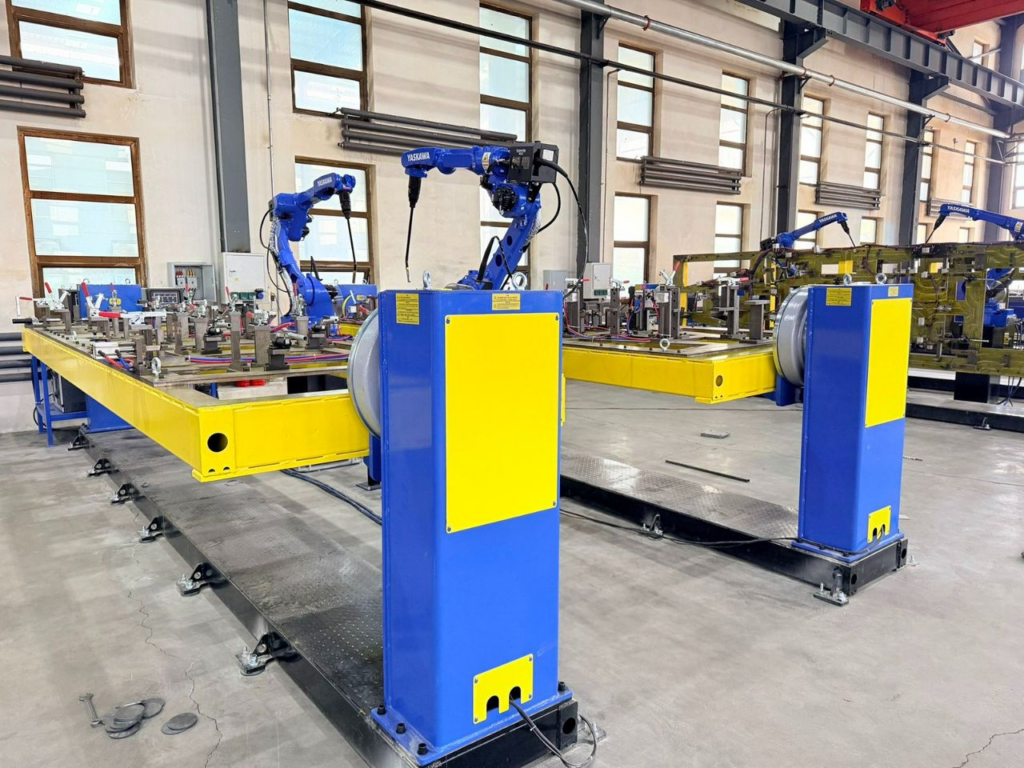
 Robot Linear track
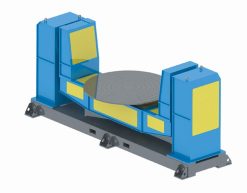 Robot welding Positioner
 Robot Torch cleaning station
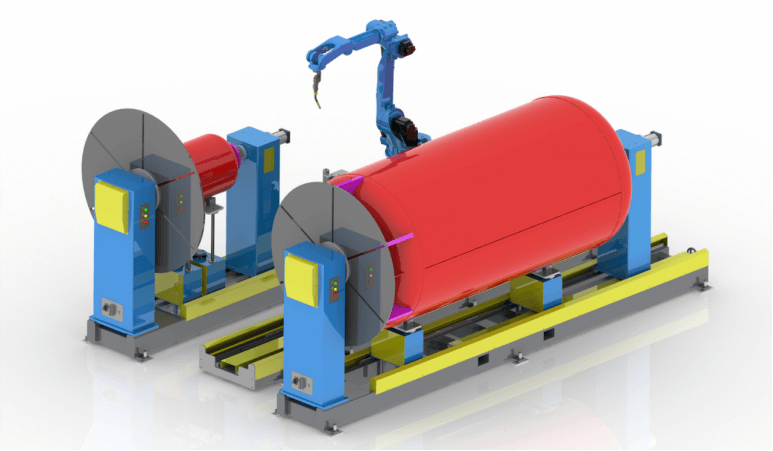 Welding Robot Workstations & Automation Solutions
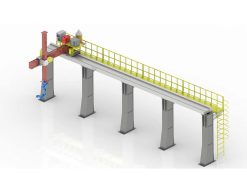
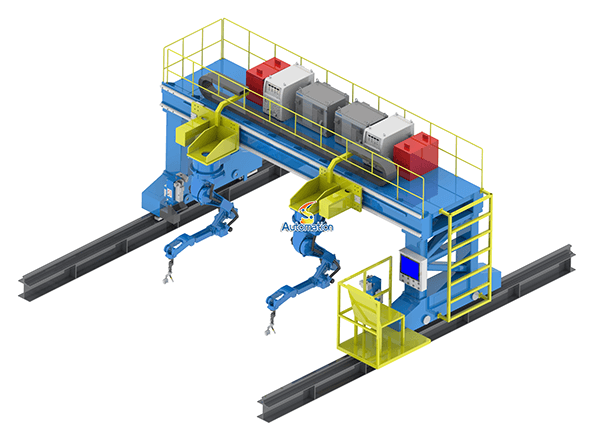 Robot Gantry System
Modern robotic welding systems are no longer limited to robot arm performance alone. To achieve higher weld quality, reduce cycle times, and improve accessibility to complex workpieces, manufacturers increasingly rely on welding positioners integrated directly with industrial robots.
Whether you’re deploying a new robotic welding cell or upgrading an existing automation line, proper integration between the robot and welding positioner is critical for achieving smooth coordinated motion and consistent welding results.
At WRS Robotics, we manufacture high-precision welding positioners, robot motion tracks, and external axis solutions compatible with leading robot brands including ABB, FANUC, KUKA, and Yaskawa. This guide explains the complete integration process from planning and installation to programming and commissioning.
Why Integrate a Welding Positioner with a Robot?
A welding positioner rotates or tilts the workpiece so the robot can maintain the ideal torch angle and welding position throughout the process.
Benefits include:
- Improved weld quality and consistency
- Better torch accessibility
- Reduced robot reach limitations
- Increased productivity
- Shorter cycle times
- Lower programming complexity
- Reduced weld defects and rework
Instead of forcing the robot into awkward positions, the workpiece moves while the robot maintains an optimal welding path.
Understanding Robot Positioner Coordination
In a robotic welding cell, the robot and positioner work as a synchronized system.
The robot controls:
- Torch movement
- Welding parameters
- Weld path execution
The welding positioner controls:
- Rotation
- Tilt movement
- Workpiece orientation
When integrated as an external axis, the robot controller treats the positioner as part of the robot system, allowing coordinated motion between all axes.
For example:
- 6-axis robot + 1-axis positioner = 7-axis system
- 6-axis robot + 2-axis ltypes welding positioner = 8-axis system
This coordinated movement significantly improves welding efficiency for large and complex components.
Step 1: Select the Right Welding Positioner
Before integration begins, choose a positioner suitable for your application.
Key factors include:
Payload Capacity
Consider:
- Workpiece weight
- Fixture weight
- Future production requirements
Common payload ranges:
- 250 kg
- 500 kg
- 1000 kg
- 2000 kg
- 5000 kg
Positioner Type
Common options include:
Single-Axis Positioners
Ideal for:
- Pipe welding
- Cylindrical parts
- Circular welds
Dual-Axis Positioners
Suitable for:
- Structural components
- Automotive frames
- Fabricated assemblies
Headstock-Tailstock Positioners
Recommended for:
- Long workpieces
- Chassis components
- Construction machinery parts
Step 2: Mechanical Installation
Proper mechanical installation directly impacts accuracy and service life.
Foundation Preparation
Ensure:
- Level concrete foundation
- Sufficient load-bearing capacity
- Anchor bolt locations verified
Alignment
The robot and positioner must be installed according to the cell layout.
Important considerations:
- Robot reach envelope
- Collision avoidance
- Maintenance accessibility
- Cable routing
Laser alignment tools are often used to verify positioning accuracy.
Fixture Installation
Fixtures should:
- Securely clamp parts
- Minimize vibration
- Allow easy loading and unloading
Poor fixture design is one of the leading causes of welding inaccuracies.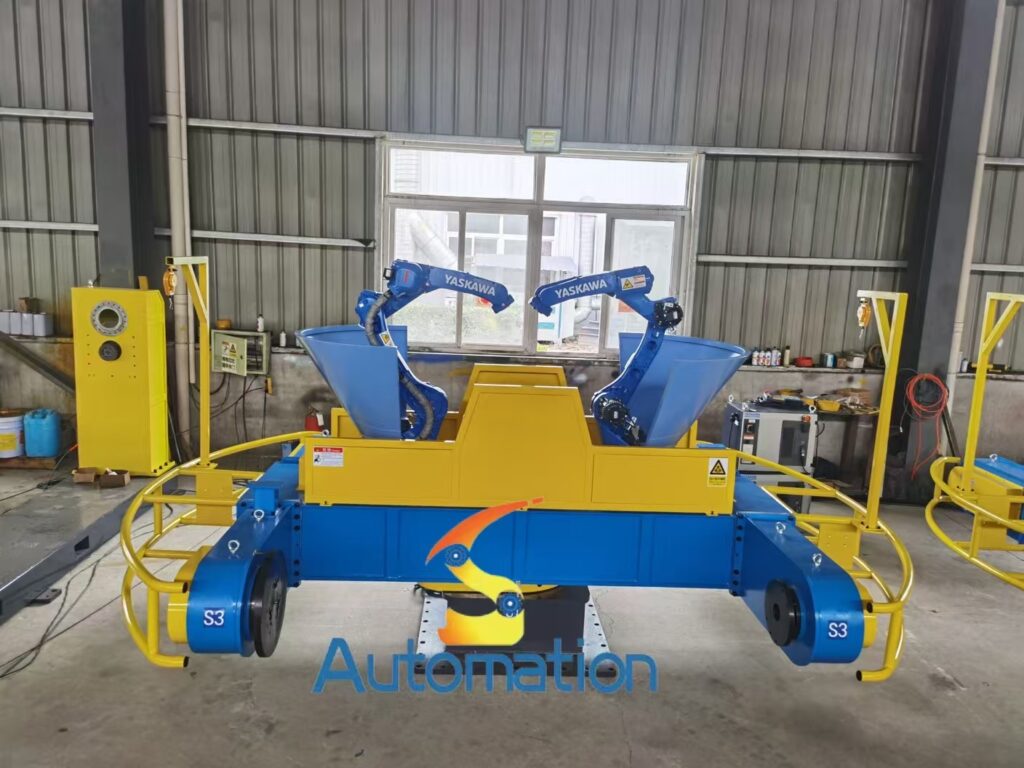
Step 3: Electrical Integration
Once mechanical installation is complete, electrical integration begins.
Servo Motor Connection
Most industrial welding positioners use servo-driven systems.
Components include:
- Servo motor
- Servo amplifier
- Encoder feedback system
- Safety circuits
Robot Controller Integration
The positioner typically connects to:
- ABB IRC5 / OmniCore
- FANUC R-30iB Plus
- KUKA KRC4 / KRC5
- Yaskawa YRC1000
The external axis is configured directly within the robot controller.
Safety Integration
Safety devices may include:
- Emergency stop circuits
- Safety PLC
- Safety scanners
- Interlocked doors
- Safety fencing
All external axes should stop immediately when a safety event occurs.
Step 4: Configure the External Axis
The next step is teaching the robot controller how the positioner moves.
Parameters typically include:
Mechanical Data
- Gear ratio
- Transmission ratio
- Maximum speed
- Rotation limits
Axis Calibration
Calibration establishes the positioner’s zero position.
Methods include:
- Mechanical reference marks
- Encoder references
- Calibration fixtures
Accurate calibration is essential for coordinated motion accuracy.
Step 5: Robot and Positioner Synchronization
This is where true coordinated welding begins.
The robot controller calculates motion for:
- Robot axes
- Positioner axes
simultaneously.
Benefits include:
- Continuous welds
- Smooth torch orientation
- Reduced repositioning time
For example, during circumferential welding, the positioner rotates while the robot maintains a fixed torch angle and travel speed.
This produces highly consistent weld quality.
Step 6: Offline Simulation and Validation
Before production begins, simulation helps identify potential issues.
Popular software includes:
- ABB RobotStudio
- FANUC ROBOGUIDE
- KUKA Sim Pro
- Yaskawa MotoSim
Simulation allows engineers to:
- Verify reachability
- Detect collisions
- Optimize cycle times
- Validate coordinated motion
This significantly reduces commissioning time on-site.
Step 7: Welding Program Development
Programming typically involves:
Teaching Weld Paths
Define:
- Start points
- End points
- Travel speed
- Torch angle
Coordinated Motion Commands
The robot controller generates synchronized movements between the robot and positioner.
Process Parameters
Configure:
- Welding current
- Voltage
- Wire feed speed
- Shielding gas flow
Fine-tuning these parameters ensures optimal weld quality.
Step 8: Testing and Commissioning
Before full production, perform validation tests.
Dry Run Testing
Run the program without welding.
Check for:
- Interference
- Axis limits
- Cable tension
- Position accuracy
Trial Welding
Evaluate:
- Weld penetration
- Weld profile
- Spatter levels
- Distortion
Adjust programs and process parameters as required.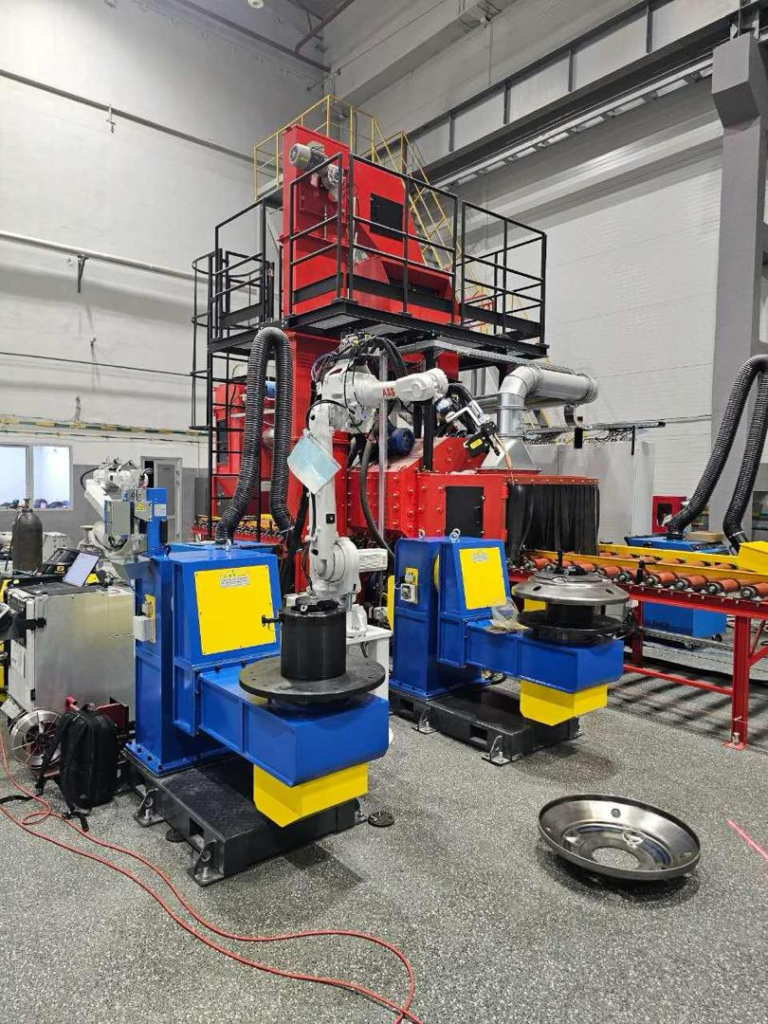
Common Integration Challenges
Positioning Accuracy Errors
Possible causes:
- Improper calibration
- Loose fixtures
- Encoder faults
Collision Risks
Possible causes:
- Incorrect TCP setup
- Poor simulation validation
- Improper workpiece modeling
Inconsistent Weld Quality
Possible causes:
- Positioner backlash
- Fixture instability
- Poor synchronization settings
Proper commissioning eliminates most of these issues before production starts.
Enhancing Productivity with Robot Motion Tracks
For large workpieces, combining a welding positioner with a robot motion track creates a highly flexible welding system.
Advantages include:
- Extended robot working range
- Reduced robot size requirements
- Higher productivity
- Better utilization of floor space
A robot motion track, often called a 7th axis or linear track, allows the robot to travel along the length of large structures while remaining synchronized with the welding positioner.
Applications include:
- Truck chassis welding
- Heavy equipment manufacturing
- Shipbuilding
- Steel fabrication
- Automotive frame welding
Why Choose WRS Robotics?
WRS Robotics specializes in manufacturing robotic welding positioners, robot motion tracks, and customized external axis solutions for industrial automation.
Our solutions are widely integrated with:
- ABB Robots
- FANUC Robots
- KUKA Robots
- Yaskawa Robots
We support:
- Single-axis positioners
- Dual-axis positioners
- Headstock-tailstock systems
- Robot linear tracks
- 7th axis systems
- Custom robotic welding cells
With extensive experience supporting system integrators worldwide, we help customers improve welding quality, increase throughput, and maximize automation ROI.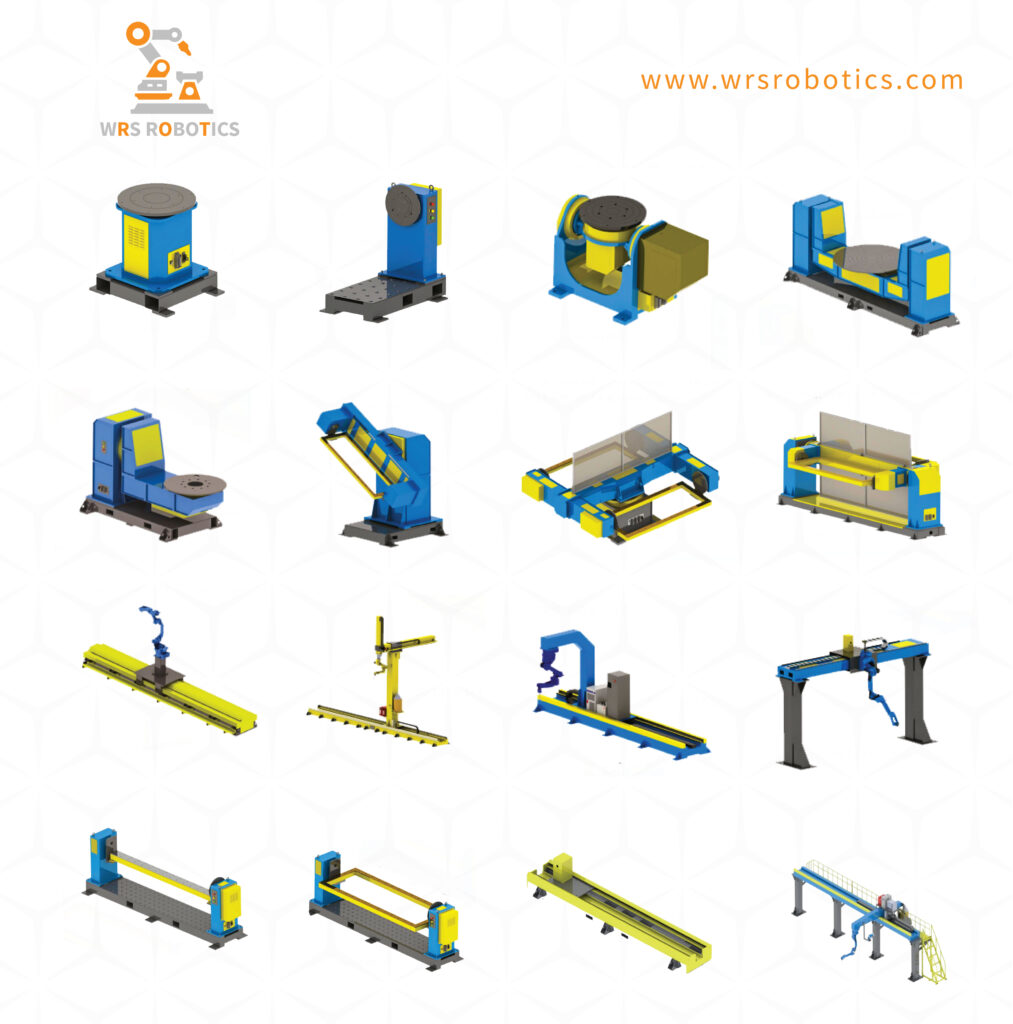
Final Thoughts
Integrating a welding positioner with an industrial robot is one of the most effective ways to improve weld quality, productivity, and automation efficiency. A properly engineered external axis system allows the robot to work smarter, maintain ideal welding positions, and handle increasingly complex parts.
Whether you are building a new robotic welding cell or upgrading an existing production line, selecting the right positioner and ensuring proper integration are essential for long-term success.
Need Help Selecting the Right Welding Positioner?
WRS Robotics provides custom-engineered welding positioners, robot motion tracks, and external axis solutions for ABB, FANUC, KUKA, and Yaskawa robotic systems.
🌐 Visit: www.wrsrobotics.com
📧 Contact: info@wrsrobotics.com
Request a consultation today to discuss your robotic welding automation project.